Beiträge von AmbiMod

    I saw that you have trouble with this device and I want to test by myself if it's working.


    First, I test on my Windows Notebook but the capture is not working ( maybe power problem ).


    Then i test on my Mac and I got a picture. Finally I test on my raspberry pi and I got the same message than you.


    After plugged a 3A adapter to the Pi, everything is working as expected.


    My source is an Amazon fire stick 4K.


    Screenshot when I made a lsusb


    and a dmesg when I plug the device


    Good news : No video pattern

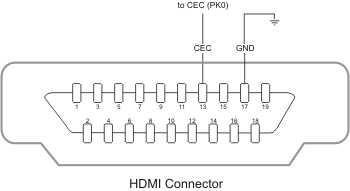
    Bad news : Not CEC ( but i use the soldering method to have it )


    :D I almost made a tutorial for everything to explain Ambilight and I know that I’m crazy :eek:


    The last one take hours of reading and a lot of people stop to read because too long and too complicated.


    I want to explain and want people understand what they are doing, not make sheep to just click on button.


    And you’re right camera is not good as expected. I think we gonna be slave of wires for many years.


    Thanks for the compliment :thumbup:


    Hi


    you can take a look on my old tutorial
    https://ambimod.jimdofree.com/2017/07/07/tuto-faire-du-hue-hue-like-avec-une-caméra-un-raspberry-et-hypérion/


    You will find a step by step process to make recognise your camera... you need to adapt to Hyperion ng next.


    i use it for Hue like because trapezoidal tools wasn’t yet implemented when I wrote it so you can use it now for Ambilight if you put your camera in the right angle.


    otherwise an hdmi input for RPi exist. I have one at one and need to made new test to see if I can use it to replace my hdmi grabber ( same as camera but a hdmi connector at the end ).


    I hope you will succeed ( but you need to change your OS first ).


    Ps : in french sorry

    @AmbiMod in the first picture the connection seem to go from IN1 (R26) to OUT 2 (R61). In the last pictures it looks like it goes from In (Pin13) to OUT2 (R61).


    Did both ways work? Or is from In (Pin13) to OUT2 (R61) the right way?


    Hi.


    the both method works normally. The first picture was taken by the one who found the trick and this is his device. On the 2 others is not the same device because my other friend burn the card so he send the device to the first one how solved it.


    You will find small hole on the top of the R61 ( and maybe the same on the other i don’t know) . It’s pretty easy to do.

    Love it man, esp the integration to secure the parts :thumbup: very very clean and nicely done.


    I was planning a similar setup to your AmbiPiBox, only thing that put me off was the HDMI extenders or piggy backing the cables inside the box and routing excess cable around the inside, How did you handle it?


    This project is old, few years ago. I tried to work on new one but I never have the time to finish it, always something to do or write.


    I put this hdmi female female on my box and an hdmi adapter to connect the VideoGrabber on it.


    i already have the same for usb3. I will see what I’m gonna use. Connect the grabber on hdmi or usb front panel. I need to return to work on it when I have time. When ? I don’t know.


    Here you will see my last draw


    https://www.dealabs.com/discus…d-et-modelisation-1886237


    or here https://ambimod.jimdofree.com/projet/


    I hope the box looks like that

    what is the point of having 4 instances running at the same time on diffrent type of ledstrips, you are just using a diffrent hardware of the Raspi on each GPIO
    thats nice but what is the point>> to test out the capabillity of the Raspi and Hyperion.NG then i see no other usefull purpose to do that . :picture:


    Just to see if we can do it. I like try new things so why not and I hate do something like others :D


    I know that I can do it if one day I want to drive many Ambilight ledstrip on the same PI. Nevermind...


    Take a look on my blog, especially on the last tutorial in 4 parts ( already 3 parts are wrote, not 100% finished yet but I’m working on it ) maybe you will see helpfull information ).


    And yes I know that I can put ledstrip in parallel but it’s not the point of my test, too easy.


    Btw, choose ws2812b is not a good idea, ws2813, sk6812 rgb or even RGBW are much better.


    see you my friend :)

    i know this, only ledlayout is one and the same.
    so every ledstrip has the same count > at least startup led is the same, the end can differ in lenght


    i used this for christmass lightning, one long strip and a star in parallel connected.


    I don't used parallel connection, i can drive every ledstrip independenty because i used 4 instances and 4 LED protocol.


    For SPI i used spidev0.0 and spide1.0. and for the other PWM ledstrip i use ws281x for each one.


    But yes, if someone want to put a ledstrip in parallel for the bottom side, it's easiest to do like that.

    yes i have, when watching 4K content then colours is washed out/ not accurate.


    we know what that is ofcourse, Hyperion.NG can not handle HDR info > something i have to get into later on.
    Maybe i try the fork of Awawa Hyper HDR on my second PI but for now i am okay with it > my original installation is going to stay
    i am not going to butcher that.


    Maybe i look into filtering it out with splitters and such, 2 splitters in series someone here had was filtering out the HDR to Hyperion.NG
    we see.


    Ok i'm asking why you don't used the HyperHDR version of our friend Awawa. My setup is Raspberry Pi 4 + Ezcoo HDMI Splitter ( The big one with optical OUT ) and Videograbber HDMI Rullz Coffee.
    And it's ok on my side.

    so the APA102 you mentioned, I take it you run them from 2 board SPI pins or would another Ardruino be better? are level shifter or any other parts required?


    You can drive more than one LEDstrip connected to Raspberry GPIO. I connected and drived 4 LEDstrip at the same time with Hyperion without anything. ( 2 SPI SK9822, one SK6812 RGBW and one WS2813).


    I made this video with only 3 LEDstrip but it's working with 4 ( My LEDstrip gone crazy after few moment maybe due to the fact that SPI buffer was too low ). I will made a new test ASAP.

    Externer Inhalt www.youtube.com
    Inhalte von externen Seiten werden ohne Ihre Zustimmung nicht automatisch geladen und angezeigt.
    Durch die Aktivierung der externen Inhalte erklären Sie sich damit einverstanden, dass personenbezogene Daten an Drittplattformen übermittelt werden. Mehr Informationen dazu haben wir in unserer Datenschutzerklärung zur Verfügung gestellt.


    Very pratical if you want to do put MutltiZone LEDstrip under the TV.


    @jeroen warmerdam You don't have Washed colours when you send HDR ?

    Faux ^^ avec mon appli il est tout a fait possible d'appliquer un effet ou une couleur sur une instance autre que la première lol .


    Avec go appli Neeeb, peut etre mais sinon pas moyen. Au passage, Appli que je n'aurai jamais sur mon iphone hein :p

    ok now im confused. on the picture it looks like Out2. I Think i will try next week.
    Do You have any other pictures, videos or sites where this is shown ?


    Yes out 2 sorry i reverse the 1 and 2. ( why i wrote message at 2 o'clock )


    One of them ( pro_info ) save the splitter of the other one who tried to solder himself.


    @AmbiMod ohh thx that sounds unbelievable. Where did you get this info ? I wonder why ezcoo didnt do this.


    I have a friend of mine on the french ambilight discord, @pro_info. He saw picture on internet like this.


    CEC use pin 13 so he decided to solder the pin 13 of the HDMI in to the HDMI out ( 2 not 1 ).


    As you i don't know why ezcoo didn't do it directly on the chain product. So simple.


    You can have CEC on the small Ezcoo by doing this.Two friends of mine do it and it's working but be carefull.


    C'est normal car la gestion des effets ou changement des couleurs n'est applicable que sur la premiere instance, la seconde ne reagira jamais.


    Par contre en utilisation Ambilight c'est pas la meme, les 2,3,4 instances reagiront.

    Bonjour à tous,


    Je suis en train depuis plusieurs mois deja d'ecrire un Tutoriel sur l'Ambilight a base d'Hyperion NG/ HyperHDR ( qui s'apparente plus a un guide complet vu la longueur ) que j'ai divisé en plusieurs parties.


    Je sais qu'il est très long à lire, qu'il part parfois dans tout les sens mais il a le merite d'exister. Je ne demande pas à ce qu'on le lis en entier ou qu'on maitrise toutes les infos presente sur ce dernier mais si ca peut etre une bonne base pour certains, pourquoi pas.


    Ils n'auront qu'a prendre les passages qui les intéresse et faire les manips de leurs cotés.


    Voici les liens en questions.


    Partie 1 : https://ambimod.jimdofree.com/mettre-en-place-une-installation-ambilight-hyperionng-hyperhdr-pc-µpc-et-divers-elements-lumineux-partie-1-4/
    Partie 2 : https://ambimod.jimdofree.com/mettre-en-place-une-installation-ambilight-hyperionng-hyperhdr-pc-µpc-et-divers-elements-lumineux-partie-2-4/
    Partie 3 : https://ambimod.jimdofree.com/mettre-en-place-une-installation-ambilight-hyperionng-hyperhdr-pc-µpc-et-divers-elements-lumineux-partie-3-4/


    Je suis en train de les relire et rajouter des informations au fur et a mesure. Cela me prend beaucoup de temps et je vous prie de m'excuser par avance si il n'y a pas encore tout.


    Bonne lecture.


    PS : Si vous tombez sur une vidéo, la maison du jeedom parlant de mon tuto comme etant du blabla, passez votre chemin, elle ne vous apportera rien de bon, aussi bien le contenu de la vidéo que les commentaires.

    Here is mine with some tweaks


    What i changed twice in WrapperLedControl.cpp


    Code
    #ifdef CONFIG_LED_CLOCKLESS_CHIPSET
    into
    #ifdef CONFIG_LED_CLOCKLESS


    and in WrapperOTA.cpp

    Code
    // ArduinoOTA.setPassword((const char *)"schnulli");
    ArduinoOTA.setPassword((const char *)OTA_PASSWORD);